Fitting head gaskets with asbestos substitute sandwich to SV engines
Non asbestos gaskets have a layer of material that is more resilient than the ‘old’ asbestos type. The outer layers of copper are also often very slightly thicker. This means that, as you pull the head down onto the block, resistance is felt very suddenly. There is not the gentle build-up that is experienced with the asbestos sandwich that allows torquing down to a pre-set figure with gradual increments.
Use of a torque wrench will usually leave the gasket uncompressed and lead to failure of the joint in a very short time-perhaps as little as a few miles along the road. Hence, a manufacturer recommends the use of the technique that used to be practiced before the advent of torque wrenches.
If the previous gasket blew, do check that the head and block are not damaged; the narrow spacing between cylinders is a danger area. A steel rule held on edge with the light behind can show if there is excessive warping or erosion. The head will not ‘straighten up’ as you tighten it down nor will the gasket fill up a pit caused by escaping exhaust gases.
The gasket should be fitted in the usual way, ensuring that the face of the block and head and the studs and stud holes are clean and any waterways are clear-particularly any of the very tiny ones that are found between many blocks/heads. A smear of light oil can be applied to the faces but no gasket cement should be necessary. Using a ring spanner, the head should be pulled down onto the block by following the sequence given by the manufacturer, which broadly is from the centre outwards. When the nuts feel uniformly tight, add a further one eighth of a turn.
It is most unlikely that you can apply excess torque with a standard ring spanner. That’s why spanner lengths vary-unlike a torque wrench with a long arm and (potentially) considerable leverage.
Start the engine after the water is added etc. And allow it to reach normal temperature and warm through. You may add a blanket over the radiator to speed this up, but keep a close eye on the temperature to prevent boiling. Stop the engine and retighten the nuts while still hot. Invariably they will take up some more. If you have an aluminium ‘aftermarket’ head, retighten when cold.
Use the car normally and after about 200 miles retighten again.
The two re-tightening activities are important to give reliable operation.
With thanks to Ian P. Harris.
To remove bottom fan belt :-
Firstly why is this pulley so tight and hard to remove , it’s because the alloy pulley and the camshaft are fitted togather by the use of male and female tapers , this method predates the industrial revolution and when fitted togather and secured with the minimum of force results in a very hard to break bond .
Removal method ,
1/ Tape a sheet of stiff cardboard to the area of the radiator core in front of the fan assembly , this is to prevent accidental damage .
2/ Remove securing nut and locking washer , replace nut minus the washer , do not tighten nut , leave a space between nut and pulley .
3/ Do not attempt to punch off the pulley or use a extractor device , this will only result in a damaged pulley .
4/ Obtain a punch of softer material than the pulley ie : very hard wood , aluminum or hard nylon .
5/ By using this punch, tap one the pulley spokes near the outer rim , tap in a downwards direction , after a few hard blows the pulley should move of the camshaft taper , it’s important that the punch blows are directed downwards not horizontally , the loosely fitted nut will prevent the pulley flying off and damaging the radiator core .
6/ on very extreme conditions were the securing nut has been over tightened , the use of gently heat ie: from a heat gun is permissible , direct the heat to the pulley area and the difference in coefficient of expansion of dissimilar metals will release the taper .
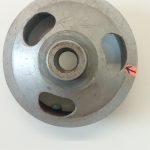
I have seen numerous badly damaged fan bet pulleys on autojumble stalls , most of the damage being caused by ill advised removal procedure The indicated spot is the correct area to punch downwards using a soft punch , remembering to use a punch softer than the pulley and always punch downwards , never horizontal
With thanks to Eddie Loader